Roof square footage refers to the total surface area of a roof, not just the flat size of the house. This is one of the most important concepts when learning how to calculate square footage of a roof, because many people mistakenly assume that the floor area of a home is equal to the roof area. In reality, roofs are sloped structures, which means their actual surface is larger than the footprint of the building. The steeper the roof, the more surface area it has, even if the house size stays the same.
To understand this clearly, imagine looking at a house from above. The outline you see is called the “footprint.” However, the roof is not flat—it rises and slopes in different directions. These angles add extra surface area that must be included in calculations. This is why roofing professionals always avoid using only ground measurements. Instead, they account for every slope, ridge, and section of the roof to get a realistic number.
Another important detail is that most roofs are not a single flat surface. They often include multiple sections such as extensions, garages, porches, and dormers. Each of these areas has its own slope and must be measured separately. When combined, these sections give the total roof square footage. Understanding this concept is the foundation for accurate roofing estimates and helps prevent costly mistakes when buying materials or planning repairs.
Tools You Need for Accurate Roof Measurement
Before learning how to calculate square footage of a roof, it is important to gather the right tools. Accurate measurement depends heavily on having proper equipment, because even small errors can lead to incorrect roofing estimates. Professionals usually rely on a mix of basic tools and digital technology to ensure precision. Without the right setup, measuring a roof becomes risky, time-consuming, and less reliable.
The most commonly used tool is a measuring tape, preferably a long one (50–100 feet) for outdoor use. For larger or more complex roofs, a laser distance measurer is often preferred because it provides faster and more accurate readings. In addition, a ladder is necessary for accessing roof edges safely. Safety equipment such as harnesses and non-slip shoes should never be ignored, especially when working on steep surfaces. Many contractors also use satellite-based tools or roofing apps that estimate roof dimensions without physical climbing.
Another helpful tool is graph paper or digital sketching software, which allows you to map the roof layout. Since most roofs are made of multiple sections, drawing a simple diagram helps break the structure into measurable parts. A calculator is also essential for adding all sections and applying pitch adjustments later. Together, these tools form the foundation of an accurate and safe roof measurement process, reducing guesswork and improving overall results.
Step-by-Step Method to Measure Roof Base Area
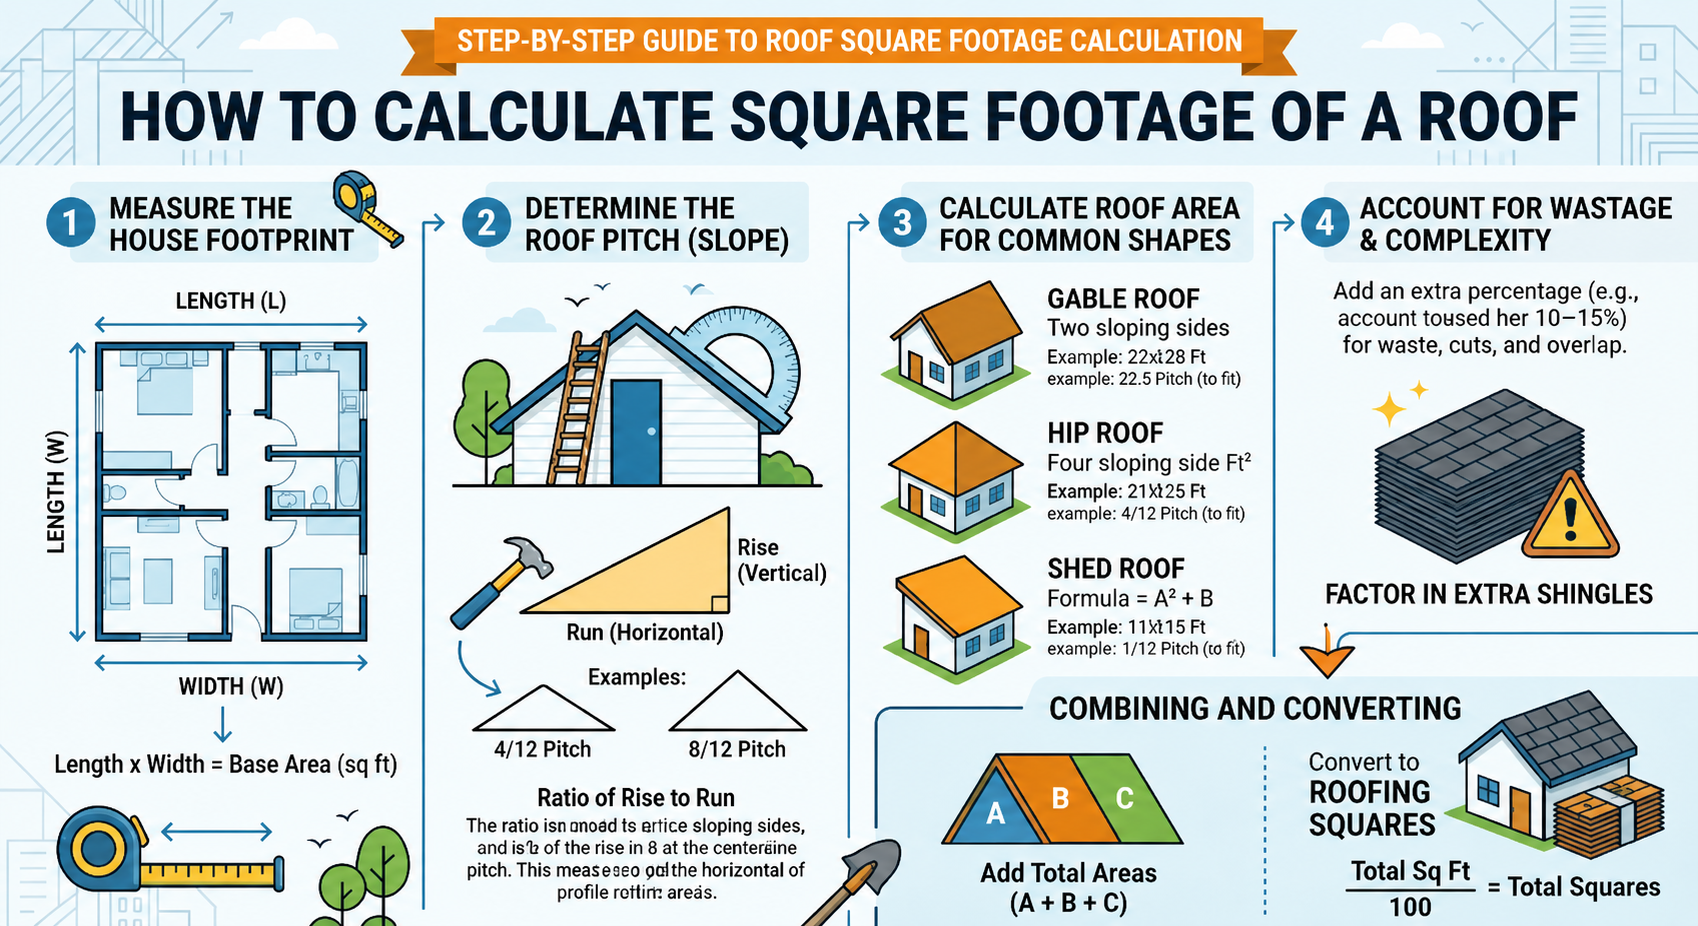
When learning how to calculate square footage of a roof, the first practical step is measuring the base area of the roof. This means calculating the flat footprint of the house before considering any slope or pitch. The reason professionals start here is simple: it gives a clean foundation that can later be adjusted for roof angles. Without this step, the final calculation would be incomplete and inaccurate.
To begin, divide the roof into simple geometric shapes such as rectangles and triangles. Most residential roofs can be broken down this way, even if they look complex at first. Measure the length and width of each section using a measuring tape or laser device. For rectangular sections, multiply length by width. For triangular sections, use the formula (base × height ÷ 2). Write down each section separately so nothing gets missed during calculation.
After calculating all individual sections, add them together to get the total base area. This total represents the flat ground coverage of the roof, not the actual sloped surface. It is important to stay organized during this step because even a small measurement error can affect the final roofing estimate. Professionals often double-check each section to ensure accuracy before moving to the next stage, which involves adjusting for roof pitch.
How Roof Pitch Affects Total Square Footage
One of the most important parts of how to calculate square footage of a roof is understanding roof pitch. Roof pitch refers to the steepness or angle of the roof, and it has a direct impact on the actual surface area. A common mistake people make is ignoring pitch and only using flat measurements, which leads to underestimating the real roof size.
A roof is never completely flat; even a slight slope increases the surface area compared to the ground footprint. The steeper the pitch, the more additional material is needed to cover it. For example, a low-sloped roof will have a small adjustment factor, while a steep roof can increase the total area significantly. This is why two houses with the same base size can have very different roofing requirements.
Professionals use a pitch multiplier to adjust calculations. This multiplier is based on how much the roof rises vertically over a 12-inch horizontal distance. Once the pitch is identified, the flat area is multiplied by this factor to get the true roof surface area. This step ensures that all slopes are properly accounted for, making the final measurement accurate and suitable for material planning and cost estimation.
Converting Measurements into Roofing Squares
After calculating the adjusted roof area, the next step in how to calculate square footage of a roof is converting the result into roofing “squares.” This is a standard unit used in the roofing industry to simplify material estimation and pricing. One roofing square is equal to 100 square feet of roof surface. This means instead of working with large and complex numbers, contractors can use a simpler measurement system.
To convert square footage into roofing squares, you simply divide the total roof area by 100. For example, if your final calculated roof area is 2,000 square feet, then the roof equals 20 roofing squares. This step is extremely important because roofing materials such as shingles, underlayment, and flashing are typically sold based on this unit rather than raw square footage.
This conversion also helps when comparing contractor quotes. If one estimate says 18 squares and another says 20 squares for the same roof, you can easily identify differences in measurement or pricing. It brings consistency across the entire roofing industry and ensures that both homeowners and professionals are speaking the same measurement language when planning a roofing project.
Common Mistakes to Avoid During Calculation
When learning how to calculate square footage of a roof, many people make small but costly mistakes that lead to incorrect estimates. One of the most common errors is ignoring roof pitch and only using the flat ground area. This results in underestimating the actual roof size, which can cause material shortages during installation or unexpected extra costs later.
Another frequent mistake is failing to measure each roof section separately. Many roofs are not simple shapes—they often include extensions, garages, dormers, and angled sections. If these parts are not measured individually and added correctly, the final calculation will not reflect the true roof size. Even professionals double-check each section to avoid missing hidden areas that are not visible from the ground.
A third mistake is rounding numbers too early in the process. While rounding may seem convenient, it can reduce accuracy when dealing with multiple sections and pitch adjustments. Small rounding errors can add up and significantly affect the final result. To avoid this, it is better to keep precise measurements until the final step, then round only at the end for reporting or purchasing materials.
Real-Life Case Study: A Simple House Roof Example
To better understand how to calculate square footage of a roof, let’s look at a simple real-life example of a small single-family home. Imagine a house with a rectangular footprint measuring 40 feet in length and 30 feet in width. At first glance, you might assume the roof area is just 40 × 30 = 1,200 square feet. However, this is only the flat base area and does not include the slope of the roof.
Now, assume the roof has a moderate pitch with a multiplier of 1.25. This means the actual surface area is larger due to the angle. To get the correct roof size, we multiply the base area by the pitch factor: 1,200 × 1.25 = 1,500 square feet. This adjustment ensures the sloped surface is properly accounted for, giving a realistic measurement of the roof.
Finally, we convert this into roofing squares by dividing by 100. So, 1,500 ÷ 100 = 15 roofing squares. This means the house would require approximately 15 squares of roofing material, not 12 as initially assumed from the flat measurement. This example clearly shows why pitch adjustment is essential and how small changes in calculation can significantly impact material planning and cost estimation.
Final Tips for Accurate Roofing Estimates
When mastering how to calculate square footage of a roof, accuracy comes down to careful measurement, patience, and double-checking every step. Even small errors in measurement or calculation can lead to ordering too much or too little material, which directly affects cost and project timelines. That’s why professionals always take extra time to verify each part of the process before finalizing estimates.
One of the best tips is to always recheck your measurements from different angles or tools. If possible, compare manual measurements with digital tools like laser measurers or satellite-based roof estimation methods. This cross-checking approach helps reduce human error and improves overall accuracy. Another useful practice is to draw a simple roof diagram before starting calculations so that no section is overlooked.
It is also important to always include a waste factor in your final estimate. Roofing materials are often cut, adjusted, or damaged during installation, so professionals typically add an extra 5% to 15% depending on roof complexity. Steeper or more complex roofs require a higher buffer.
In conclusion, understanding how to calculate square footage of a roof is not just about numbers—it’s about precision and planning. When done correctly, it ensures cost-effective material use, smoother installation, and fewer surprises during construction. Careful measurement today leads to a stronger, safer roof tomorrow.
Conclusion
Understanding how to calculate square footage of a roof is essential for accurate roofing planning, budgeting, and material estimation. From measuring the base area to adjusting for roof pitch and converting results into roofing squares, each step plays an important role in getting a reliable final number. When done correctly, it helps avoid material shortages, reduces unnecessary costs, and ensures smoother project execution. A well-calculated roof estimate is always more efficient than guesswork, especially when dealing with complex roof designs or multiple sections.
FAQs
What is the easiest way to calculate roof square footage?
Break the roof into simple shapes, calculate each section’s area, and then add them together before adjusting for pitch.
Why is roof pitch important in measurement?
Roof pitch increases the surface area compared to the flat footprint, so ignoring it leads to inaccurate estimates.
What are roofing squares?
One roofing square equals 100 square feet and is commonly used in the roofing industry for material estimation.
Can I calculate roof square footage without climbing the roof?
Yes, you can use ground measurements, building plans, or digital tools, but pitch adjustment is still necessary for accuracy.
Visit for More information : Multiple Magazines